Integrasi N8N dengan OpenClaw — Workflow Automation Powerhouse

📎 Source:n8n-integration.md — view on GitHub & star ⭐
OpenClaw + n8n Integration Tutorial
Connect OpenClaw to 400+ apps via n8n workflow automation. No coding required.
Why n8n + OpenClaw?
The Problem
Problems:
- ❌ Each integration needs custom code
- ❌ OAuth setup for every service
- ❌ Maintenance nightmare
- ❌ Hard to modify workflows
The Solution
Benefits:
- ✅ One connection, unlimited integrations
- ✅ Visual drag-and-drop builder
- ✅ No code required
- ✅ Easy to modify
Example Workflow: Email to Slack
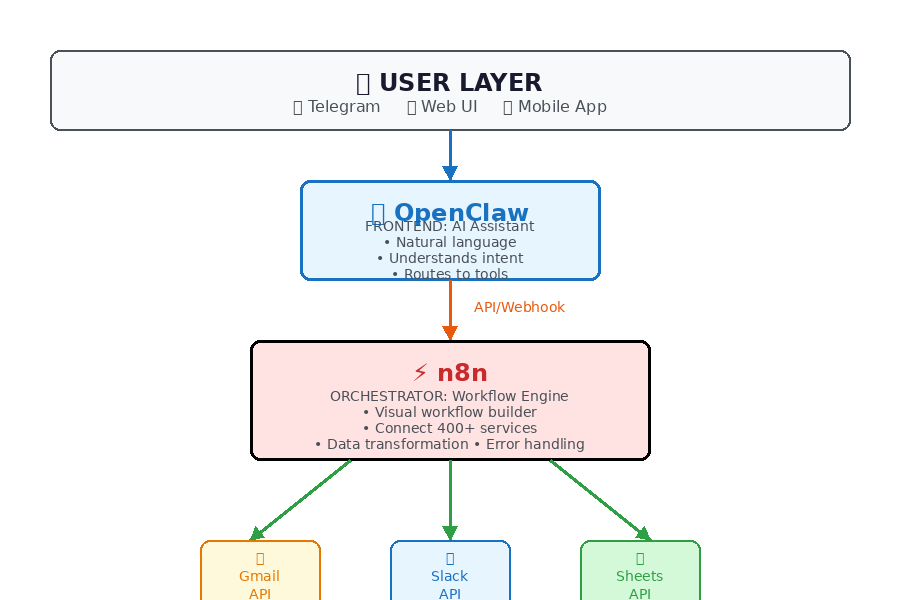
Architecture: Who's Backend, Who's Frontend?

subgraph Frontend["🎭 Frontend: OpenClaw"]
    OC["🤖 OpenClaw Agent"]
    NL["💬 Natural Language"]
    INT["🎯 Intent Routing"]
end

subgraph Orchestrator["⚙️ Orchestrator: n8n"]
    N8N["🔄 n8n Workflow Engine"]
    TRIG["⚡ Triggers"]
    ACT["🔧 Actions"]
    LOGIC["🧩 Logic/Conditions"]
end

subgraph Backend["☁️ Backend Services"]
    GM["📧 Gmail API"]
    GD["☁️ Google Drive"]
    SL["💬 Slack API"]
    NT["📝 Notion API"]
    AT["📊 Airtable"]
end

TG --> OC
WEB --> OC
MOB --> OC

OC -->|API/Webhook| N8N

N8N --> TRIG
N8N --> ACT
N8N --> LOGIC

ACT --> GM
ACT --> GD
ACT --> SL
ACT --> NT
ACT --> AT

style User fill:#e3f2fd,stroke:#1976d2
style Frontend fill:#fff3e0,stroke:#f57c00
style Orchestrator fill:#c8e6c9,stroke:#388e3c
style Backend fill:#f3e5f5,stroke:#9c27b0'}
Summary:
What You Can Build
🔄 Two-Way Communication Flow

subgraph Response["📥 Incoming Response"]
    API2["☁️ API Result"]
    N8N2["🔄 n8n Process"]
    OC2["🤖 OpenClaw Format"]
    U2["👤 User Gets Answer"]
end

U1 -->|"Send email"| OC1
OC1 -->|Webhook| N8N1
N8N1 -->|Call| API1

API1 -->|Result| API2
API2 -->|Parse| N8N2
N8N2 -->|JSON| OC2
OC2 -->|💬 Message| U2

style Request fill:#e3f2fd,stroke:#1976d2
style Response fill:#c8e6c9,stroke:#388e3c'}
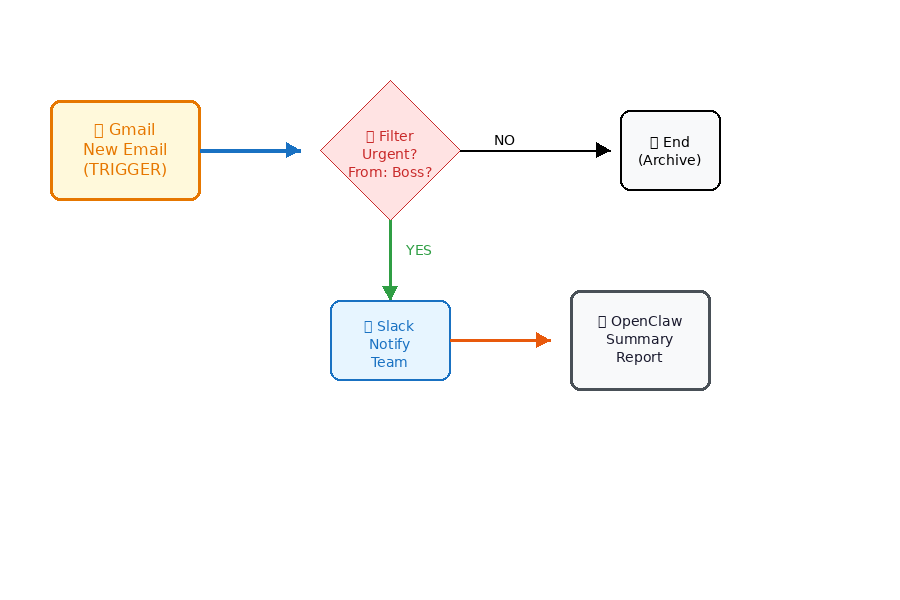
Example 1: Email to Slack Notification
┌──────────┐     ┌──────────┐     ┌──────────┐     ┌──────────┐
│  Gmail   │────▶│    n8n   │────▶│  Filter  │────▶│  Slack   │
│  (New    │     │  Trigger │     │ (AI/Key  │     │ (Notify  │
│   Email) │     │          │     │  words)  │     │  Team)   │
└──────────┘     └──────────┘     └──────────┘     └──────────┘
                                                        │
                    ┌───────────────────────────────────┘
                    ▼
            ┌──────────────┐
            │  OpenClaw    │
            │  (Summary    │
            │   Report)    │
            └──────────────┘
Flow:
- New email arrives in Gmail
- n8n detects it (trigger)
- Filter: Only urgent emails (from boss, contains "ASAP")
- Send Slack notification to team
- OpenClaw generates daily summary
Example 2: Form to Database to Notification
┌──────────┐     ┌──────────┐     ┌──────────┐     ┌──────────┐
│  Google  │────▶│    n8n   │────▶│  Google  │────▶│  Email   │
│  Form    │     │  (Parse  │     │  Sheets  │     │ (Confirm │
│(Response)│     │   Data)  │     │ (Store)  │     │  User)   │
└──────────┘     └────┬─────┘     └──────────┘     └──────────┘
                      │
                      ▼
               ┌────────────┐
               │  OpenClaw  │
               │ (Process   │
               │   Request) │
               └────────────┘
Flow:
- User submits Google Form (RFQ/tender)
- n8n parses form data
- Store in Google Sheets (CRM)
- Send confirmation email to user
- OpenClaw reviews and drafts response
Example 3: Multi-Step Approval Workflow
┌──────────┐
│  Request │
│  Created │
└────┬─────┘
     │
     ▼
┌──────────┐     ┌──────────┐
│   n8n    │────▶│ Manager  │
│  (Route  │     │ Approval │
│   Task)  │     └────┬─────┘
└──────────┘          │
                      ▼
               ┌──────────┐
               │ Approved?│
               └────┬─────┘
                    │
           ┌────────┴────────┐
           │                 │
           ▼                 ▼
     ┌──────────┐      ┌──────────┐
     │   Yes    │      │    No    │
     │          │      │          │
     ▼          │      ▼          │
┌──────────┐   │  ┌──────────┐   │
│ Execute  │   │  │  Notify  │   │
│  Task    │   │  │  User    │   │
└──────────┘   │  └──────────┘   │
               │                 │
               └────────┬────────┘
                        │
                        ▼
                 ┌────────────┐
                 │  OpenClaw  │
                 │  (Final    │
                 │   Report)  │
                 └────────────┘
Step-by-Step Setup
Step 1: Install n8n
Option A: Self-Host (Recommended for privacy)
# Using Docker
docker run -it --rm \
  --name n8n \
  -p 5678:5678 \
  -v ~/.n8n:/home/node/.n8n \
  n8nio/n8n
Option B: Cloud (n8n.io)
- Sign up at https://n8n.io/cloud
- Free tier: 1,000 executions/month
- No setup required
Step 2: Create First Workflow
┌─────────────────────────────────────────────────────────┐
│                    n8n Editor                            │
│                                                          │
│  ┌─────────────────────────────────────────────────┐    │
│  │  1. ADD TRIGGER                                  │    │
│  │     Click [+] → Search "Webhook" → Select        │    │
│  │                                                  │    │
│  │     [Webhook] ──────►                            │    │
│  │     URL: https://n8n.yourdomain/webhook/xxx      │    │
│  └─────────────────────────────────────────────────┘    │
│                         │                                │
│                         ▼                                │
│  ┌─────────────────────────────────────────────────┐    │
│  │  2. ADD ACTION                                   │    │
│  │     Click [+] → Search "Gmail" → Send Email      │    │
│  │                                                  │    │
│  │     [Webhook] ────► [Gmail]                      │    │
│  │     (Trigger)       (Send Email)                 │    │
│  └─────────────────────────────────────────────────┘    │
│                         │                                │
│                         ▼                                │
│  ┌─────────────────────────────────────────────────┐    │
│  │  3. ADD MORE ACTIONS                             │    │
│  │     Keep adding nodes as needed                  │    │
│  │                                                  │    │
│  │     [Webhook] ────► [Gmail] ────► [Slack]       │    │
│  │     (Trigger)       (Email)       (Notify)      │    │
│  └─────────────────────────────────────────────────┘    │
│                                                          │
│  [💾 Save]  [▶️ Execute]  [🚀 Activate]                   │
└─────────────────────────────────────────────────────────┘
Step 3: Connect OpenClaw to n8n
Method A: Webhook (Simple)
# In OpenClaw, call n8n webhook
import requests

n8n_webhook_url = "https://n8n.yourdomain/webhook/abc123"

data = {
    "message": "New task from user",
    "sender": "user@example.com",
    "priority": "high"
}

response = requests.post(n8n_webhook_url, json=data)
Method B: n8n Node (Advanced)
┌─────────────────────────────────────────────────────────┐
│  n8n HTTP Request Node                                   │
│                                                          │
│  Method: POST                                            │
│  URL: https://api.openclaw.ai/v1/execute                │
│  Headers:                                                │
│    Authorization: Bearer YOUR_TOKEN                     │
│  Body:                                                   │
│    {                                                     │
│      "agent": "radit",                                   │
│      "task": "Analyze this email"                       │
│    }                                                     │
└─────────────────────────────────────────────────────────┘
Step 4: Two-Way Communication
┌─────────────────────────────────────────────────────────┐
│              TWO-WAY INTEGRATION FLOW                    │
│                                                          │
│  ┌─────────┐              ┌─────────┐              ┌────┴────┐ │
│  │  User   │─────────────▶│ OpenClaw│─────────────▶│   n8n   │ │
│  │ Request │  "Send email │ Process │  "Execute   │ Workflow│ │
│  │         │   via n8n"  │ Intent  │   workflow"  │         │ │
│  └─────────┘              └────┬────┘              └────┬────┘ │
│                                │                        │       │
│                                │                        ▼       │
│                                │               ┌─────────────┐  │
│                                │               │  Call APIs  │  │
│                                │               │  (Gmail,    │  │
│                                │               │   Slack...) │  │
│                                │               └──────┬──────┘  │
│                                │                      │         │
│                                │                      ▼         │
│                                │               ┌─────────────┐  │
│                                └───────────────│   Result    │  │
│                                                │   Back      │  │
│                                                └─────────────┘  │
└─────────────────────────────────────────────────────────────────┘
Popular Use Cases
📊 Use Case Pipeline Overview

subgraph Form["📝 Form Automation"]
    F1["Google Form"] --> F2["Validate"]
    F2 --> F3["Save to Sheets"]
    F3 --> F4["Send Email"]
    F4 --> F5["OpenClam Summary"]
end

subgraph Social["📱 Social Monitoring"]
    S1["Twitter Mention"] --> S2["Analyze"]
    S2 --> S3{Sentiment}
    S3 -->|😊 Positive| S4["Thank You"]
    S3 -->|😐 Neutral| S5["Ignore"]
    S3 -->|😠 Negative| S6["Alert Team"]
end

style Email fill:#ffcdd2,stroke:#d32f2f
style Form fill:#c8e6c9,stroke:#388e3c
style Social fill:#e1f5fe,stroke:#0288d1'}
1. Email Processing Pipeline
[GMail Trigger] → [AI Filter] → [Classify] → [Route]
                      │              │           │
                      ▼              ▼           ▼
               [Newsletter]   [Urgent]     [Routine]
                    │              │           │
                    ▼              ▼           ▼
               [Mark Read]   [Slack +     [Auto-
                             OpenClaw]    Reply]
2. Data Entry Automation
[Form Submission] → [Validate] → [Save to DB] → [Notify]
                                          │
                                          ▼
                                    [OpenClaw Summary]
3. Social Media Monitoring
[Twitter Mention] → [Analyze] → [Sentiment] → [Action]
                                         │
                    ┌────────────────────┼────────────────────┐
                    ▼                    ▼                    ▼
              [Positive]            [Neutral]            [Negative]
                  │                     │                     │
                  ▼                     ▼                     ▼
            [Thank You]            [Ignore]            [Alert +
                                                          Response]
Security Best Practices
┌─────────────────────────────────────────────────────────┐
│                    SECURITY LAYER                        │
│                                                          │
│  1. API KEYS (n8n Credentials)                          │
│     └─► Encrypted storage                                 │
│     └─► Never expose in workflows                         │
│                                                          │
│  2. WEBHOOK SECURITY                                     │
│     └─► Use random URLs                                   │
│     └─► Add authentication headers                        │
│     └─► IP whitelist                                      │
│                                                          │
│  3. DATA FLOW                                            │
│     └─► Validate all inputs                               │
│     └─► Sanitize before sending to APIs                   │
│     └─► Log for audit                                     │
│                                                          │
│  4. ACCESS CONTROL                                       │
│     └─► Restrict n8n dashboard access                     │
│     └─► Use strong passwords                              │
│     └─► Enable 2FA                                        │
└─────────────────────────────────────────────────────────┘
Troubleshooting
Webhook Not Triggering?
✓ Check URL is correct
✓ Verify workflow is "Active"
✓ Check n8n execution logs
✓ Test with curl:
  curl -X POST https://n8n.yourdomain/webhook/xxx \
    -H "Content-Type: application/json" \
    -d '{"test":"data"}'
Authentication Errors?
✓ Re-connect credentials in n8n
✓ Check API scopes/permissions
✓ Verify token not expired
✓ Check service status page
Data Not Passing?
✓ Check field names match
✓ Verify data types (string vs number)
✓ Use "Set" node to transform data
✓ Add "Function" node for custom logic
Quick Reference
Next Steps
- Install n8n (self-host or cloud)
- Create first workflow (webhook → email)
- Connect OpenClaw (call webhook from agent)
- Build complex flows (multi-step automations)
- Monitor & optimize (check execution logs)
Resources
Tutorial Version: 1.0
Last Updated: 2026-03-08
Compatible With: OpenClaw 2026.2+, n8n 1.0+
← Artikel Sebelumnya
Smart File Butler: Assistant File Management yang Pintar
Artikel Selanjutnya →
Generate Diagram Excalidraw dengan AI — Dari Prompt jadi Visual
Baca Juga


Ada Pertanyaan? Yuk Ngobrol!
Butuh bantuan setup OpenClaw, konsultasi IT, atau mau diskusi project engineering? Book a call langsung — gratis.
Book a Call — Gratisvia Cal.com • WITA (UTC+8)
Newsletter
Subscribe to Newsletter
Artikel baru, automation notes, dan engineering insight. Clean inbox, no spam.
Dengan subscribe, kamu setuju menerima update seperlunya.